new maping techniques

new maping techniques

Discuss maps & map creation - from concept to execution to the ever elusive release.

Moderator: Moderators

Post Reply
Dead.Rabit
Posts: 264
Joined: 03 Sep 2005, 04:28

new maping techniques

Post by Dead.Rabit »

DOWNLOAD NOW
http://www.unknown-files.net/index.php? ... &dlid=1855


hello, ive been intending to do this for some time. these are some techniques ive discovered for making maps. however theyre not realy intended for novice mappers. i have written them in a way that i think anyone can understand

for these im using photoshop CS2 and L3DT

im going to focus on first the heightmap then the texture/terrain map

and here are the techniques
for heightmap

1) getting a heightmap from real geographical location from the governament national servay and using it as a heightmap
2) strategical map making with photoshop.
3) modifying it with L3DT


these are my favourites though
texture map
1) colour from heightmap (using photoshop)
2) adding foux shadow to add extra depth to maps
(can be made to give a cartooney effect photoshop)


1) getting a heightmap from real geographical location from the governament national servay and using it as a heightmap
ok well, i cant do the first step because my internet connection wont alow me to obtain the files..

but ill explain the concept. ok first you need to obtain a DEM file, (digital elevation map) which can be obtained from:

http://seamless.usgs.gov/website/seamless/viewer.php
you are looking for an elevation map
ok next step is to download some GIS shareware package. and get it to display the file as a heightmap. printscreen copy into paint and save as an image

2) map making in photoshop
well this has become pretty much bog standard, im putting it here so as that i can explain this all the way through with 1 map. i am creating a map called offshore.

first create your image. as a multiple of 1024 (1024 being 2 map units) in photoshop
change the mode to grayscale.
fill the whole room with 50% gray.
use the lassoo tool, to circle any hills that you want in your map
(remember hold shift to extend the selection and alt to retract it, can make some nice effects)
create a new layer and fill it with white.

do the same for any water only fill with black.

(this i would call a 3 level map, as you have the black level the inbetween gray level and the white level. you can however quite easy make a 5 layer using 25 and 75 % grays. for extra detail.)

rearange the layers into the darkest at the bottem and lightest at the top.
i then like to geusian blur the black and white layers so that they blend with the surroundings, and add a sleight noise blur to each layer followed by a 3 radius geusian blur again.

touch it up however you wish. =]
Image


3) modifying with L3DT
1) ok the max size the free version can take is 2048x2048 so resize your heightmap in photoshop and save as bmp.
2) open L3DT and hit file-import-heightfield
3) next go to operations-design map-generate from HF
4) now fiddle with the options and click ok
5) now go operations-heightfield-generate preview. do this until it looks how youd like it, if you dont repeat from step 3 until it looks good.
6) when your happy go operations-heightfield-generate map (this will take a small amount of time, make cuppa tea and find some more biscuites)

open it in photoshop when its done and resize it to the final image size. mine was 1281.
Image


Terrain map


1) colouring the heightmap according to height
ok well open up the largest copy of your final heightmap (probably the one that L3DT spat out which is 2048x2048)
and resize it up to the full size of your map, i.e. 512 x size of your map in map units

1) change the mode to RGB clolur
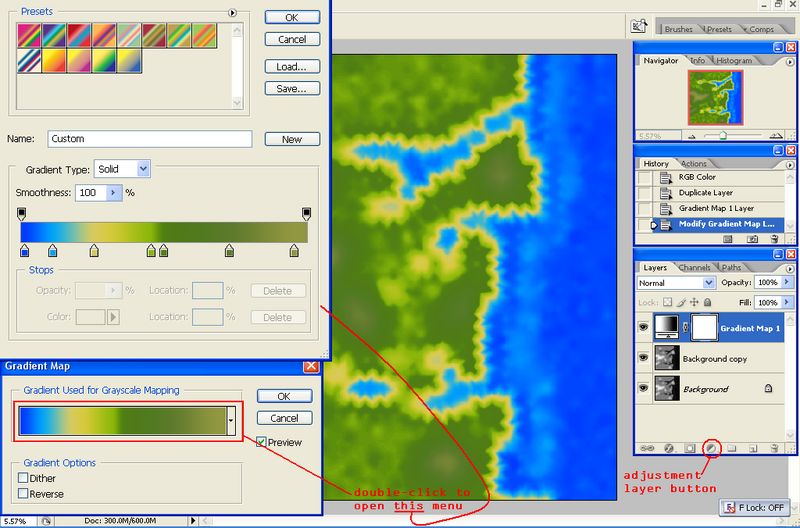
2) duplicate the background image (this is important)
3) in the layers menu click the adjustment layers button (it looks like the ying and yang symbol) and make a gradient map on top of layer1
4) this will bring up a small dialog box, and shockingly make your image black *shock*horror* try clicking on one of the preset gradients to see how this works.
5)ok now you doubleclick the bar to open up the gradient editor. the colours furthest to the left indicate the black (lower levels) of your map, so colour this maybe dark green, or blue if you have water. and keep fiddleing
(note: change the colour of a colourpicker (small arrow with a square of colour in it) just click it until a colour chart opens. to create new colour pickers you have to click just below the bar)

Image

making foux shadows
ok well. if you folowed tha last step hide the gradient adjustment layer and click on the background layer.
but incase you didnt you'll need to be in RGB mode

1) click ctrl+a (selects all)
2) ctrl+c (copies all to clipboard, this can take time.)
3) click on the channels tab and make a new channel
4) without doing anything else press ctrl+v (pastes the map onto the new channel)
5) ok now hide the newly made "alpha channel" and reselect the red,green,blue and RGB channels
6) make a new layer on top of everything else and fill it white.
7) now go to filter-render-lighting effects.
8)your gonna want directional as your light type and set your texture channel to alpha 1
9)move around the line in the image until you can see the mountains. be warned though, dont move the second dot out of the centre of the image. and remember when createing the SMD to place the sun werever you place the light to come from in this step.
10) fiddle with the other settings, until you get a result you like.
11) press ok and change the blend mode..i used vivid light =]

and heres a scale down of the final image =]

i hope this has been some use to someone
good luck.
Dead.Rabit
Image

p.s. i am trying to create metods of using 3ds max to make the texture and heightmap, the texture map is pretty easy to do, the only problem is the heightmap, im learning procedural textures to try and solve this as opposed to uvw mapping... ill add t in when i figure it out..
D.R
Last edited by Dead.Rabit on 17 Oct 2006, 02:31, edited 1 time in total.
User avatar
NOiZE
Balanced Annihilation Developer
Posts: 3984
Joined: 28 Apr 2005, 19:29

Post by NOiZE »

everybody can post in the usermap forum!


Also this wouldprobally be better in the wiki.
User avatar
Snipawolf
Posts: 4357
Joined: 12 Dec 2005, 01:49

Post by Snipawolf »

Copying from a DEM sounds like an extremely smart move for some 1944 maps, eh?
User avatar
jackalope
Posts: 695
Joined: 18 Jun 2006, 22:43

Post by jackalope »

you gonna turn that into a real map? how's it look ingame?
Dead.Rabit
Posts: 264
Joined: 03 Sep 2005, 04:28

Post by Dead.Rabit »

im trying but im getting errors. i was never good at getting pictures -> .sd7 lol
ill put the link to it at the top when im finished
User avatar
LathanStanley
Posts: 1429
Joined: 20 Jun 2005, 05:16

Post by LathanStanley »

Nice tutorial, you might want to put in some tips, etc, on the actual use of photoshop or gimp on "blurring" vs. smart tool drawing.. (squares with bevels etc.)

ALSO!!! very important, you need to add a set of instructions for using layers in photoshop, putting the texturemap, heightfield, and featuremap on the SAME PSD, and extracting each to the desired size, etc. (yes it works, you have to plan ahead though, and make the map, extract, make the heightfield, extract.. and then scale to the featuresize, make the featuremap, extract.. if you have to scale a part of the map to the featuremap etc, and want to doublecheck your accuracy, re-scale the psd compile to the texturesize, open the "exported" texturemap and copypaste onto the psd, then edit, and re-export... BUT DON'T SAVE the psd like that, it'll fubar your featuremap... rather, reload the PSD, then copy paste the "new" exported texture (or heightfield) to the psd, and scale down accordingly... )

when I get a huge stockpile of features done... lol, when it happens...

I can run you guys' heightmaps through Vue5 to generate terrains and then compile them with your pre-determined featuremaps... etc.. .. I could probably put up some screens of "terrain types" that I come up with, and take some requests and piece things together... and yeah, I'd need a server or something that you can upload to, then I can take a whack and just compile one or two at a time, then upload them to file universe or whatever... I.E. (you make the height map, load in photochop, make a featuremap etc, compile with a BLANK texture, add start locations and make the smd,smt, and sm3 files... yay, then upload the needed to the server, (height (png is fine, high detail smaller than bmp), feature (BMP ONLY!!), skybox, smd, and any features w/ ass. files) it should be like ~10 meg upload tops maybe more on HUUUUUUGGE effin maps, and I may say no on maps that big, it takes about an hour to render maps at 18x18... and yeah.. I'll upload it to file universe..)

BUT!! this is up in the air... I haven't committed myself to this yet, its just an idea...

anyways.. lets just say, that I can generate things with this program, that are, UNBELIEVEABLE!,....

that snow on severnaya, lol, that was my VERY first attempt with the program... thats probably the most basic rendering possible...

I'd like to be able to figure out how to export the tree models it can generate... then edit them in max, and stuff... but meh, blah...

(man I got off on a tangent there)

anyways, back on topic, height specific texture is VERY GOOD yes, but if you can specify, height specific to regional zones, then different specifics to different zones, all the better...

you CAN take the heightfield map, break it into parts, send it through L3DT as parts, render the parts, and then put it back together... (its a bit complicated) but if you want something interesting like, I dunno.. a canyon texture on a canyon, and a grassy hillside on the hillside at the same elevations... yup, thats prolly an easier way than SCREAMING at L3DT when it puts grass on everything... :P

also, an advantage to Vue5 is the ability to have "grade-specific" textures, and not just one, infinately many... and fun things like bumpmapping.. :-)

again, though, Vue5 isn't free, nor cheap.

but yeah, not too shabby of a tutorial, the images are nice, but it lacks some "insider info" on the inner workings of "play with the settings in L3DT" etc...

anyways, as they said get it up on the wiki, make a new page or something... and paste it all there... and when someone comes up with a NEEEDED point to add, they can do so.. :wink:

I'm actually considering making a "compiled tutorial" and just take the GOOD parts, the IMPORTANT parts, of everyones tutorials, and making a "master" tutorial.. and yes, credit goes to the authors... :P
Dead.Rabit
Posts: 264
Joined: 03 Sep 2005, 04:28

Post by Dead.Rabit »

you could do height specific i think by selecting an area of the heightmap - copy them to a new layer and make a gradient adjustment layer for each of those layers.

i made this tutorial because alot of maps i see all use the same techniques, so i thaught of developing abstract techniques. itll all come together when i can figure out procedutal texturing or a simpler way of texturing in 3DS to get a heightmap
User avatar
Weaver
Posts: 644
Joined: 07 Jul 2005, 21:15

Post by Weaver »

Some dem files here if you still want them.
Dead.Rabit
Posts: 264
Joined: 03 Sep 2005, 04:28

Post by Dead.Rabit »

ok well, ive got it working, but as it turns out that made a pretty pants map...

im redoing alot of it but using the same techniques and the same base sketches =p

D.R
Dead.Rabit
Posts: 264
Joined: 03 Sep 2005, 04:28

Post by Dead.Rabit »

ok im about to go away for a week. so ill post my current version of this map. its called ocean_view.sd7

http://www.unknown-files.net/index.php? ... &dlid=1855

things to fix.
-metal
i didnt have the time to make strategic metal points, so instead ive made the metal map a clouds filter and the extractor radius large. i need to tweak it a little but it gives ok metal, maybe too much

-height settings.
the water is just a little too low. and vehicles cant quite make it accross the map, but ive bumped up vehicle speed to make them worth building. also hovercraft cant access the water at a few points.

i'd also like to set up the colour settings nice and pretty. feel free to edit the smd and rehost it. just remember to give credit =p

stratergy
the point of this map is to claim the high ground, which is no small task, the high ground has reduced metal output however, if you control it, you can access the entire map.
alternatively use water. however water units are vulnerable in the river.

its also worth noting, ive designed this map to emphisize the units worth. tanks are fast on flats but cant climb hills. however Kbots can climb hills. but are weaker and slower on the flats.
hovers also cant climb the hills
but vehicles are ideal for defence, i.e. after you have built a factory on the hills...

good luck,


Dead.Rabit

p.s. im kinda rushing this to the host coz i need to rush off. i appologise for any major bugs
D.R
Post Reply

Return to “Map Creation”