Wings3D UV Mapping Tutorial.
Posted: 01 Jun 2007, 04:25
I'll hope people can follow basic commands.
Make sure you have advanced mode on.
Go to Edit -> Preferences -> Advanced -> Find Advanced Menus -> Click said box if not already clicked.
Spawn a cube.
Select cube.
Right Click.
Click UV Mapping
A new camera will open, with your cube in it.
Okay, now we come to a hard part (On harder models).
We can UV Map this in different ways, I'll make several examples.
Select all of the lines except the bottom ones.
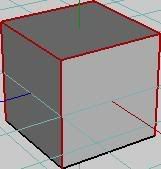
Now select "Mark Edges for Cut," and then deselect the lines.
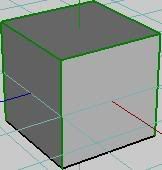
Now right click and click "Continue" and then click "Unfolding."
You should get this:
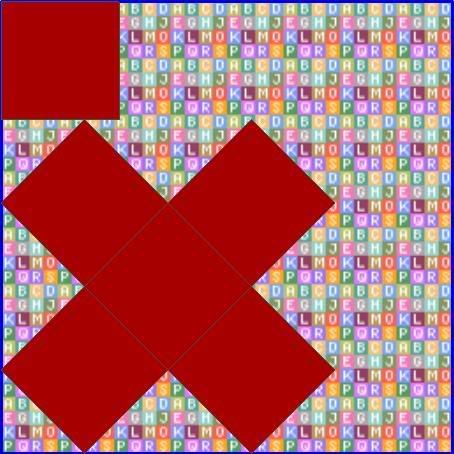
This is your UV map. Technically this would be where the tutorial ends.
But that makes me feel lazy, so let's keep going.
So. What do you do now? You make it easier to texture.
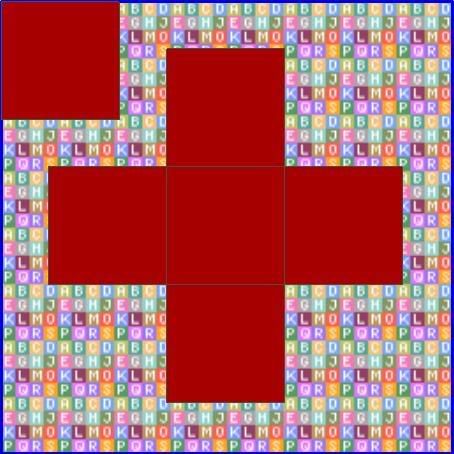
Deselect the small square in the top left, but make sure you kept the others selected.
Move them to the left, then rotate them until they make "perfect" lines.
Or, take one line and use "chart to x/y" to align the line along an axis.
Like so:
Now, make sure you have everything selected. Right click and find "Create Texture" at the bottom of the menu. When you click on this,
you will see this menu:
Except, yours has a lot more passes, click on "Delete Unused Pass" and it'll solve your problem.
Click here:
And then select color, and it should default to white, if not.. You should know how to make sure it does.. (PS: Click on the white square)
Click OK, and then click the other OK. Deselect your maps and you should have this:
This is your texture. You need to be able to edit it though, right?
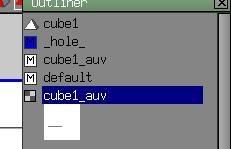
So, select Window->Outliner, at the top:
And now, find cube1_auv:
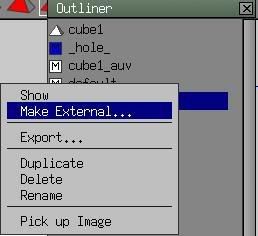
Left click, then right click and "Make External" should be an option there.
Now save it as cube1_auv.png.
Png is a very versatile image format. As you can see from my screenshots, JPG is not very reliable unless you have full quality, and even then, it does not support alpha channels, like a PNG does.
NOTE: THE NAME OF THE TEXTURE INSIDE AND OUTSIDE MUST STAY THE SAME! DO NOT CHANGE THE NAME OF THE TEXTURE YOU JUST MADE EXTERNAL OR IT WILL NOT SHOW UP FOR YOUR MODEL.
Okay. Find your texture, it may have saved in a folder that you last edited, or in Wings3D's main folder.
Open it up in your best or favorite application for texturing, I would suggest GIMP, if you don't already have Photoshop.
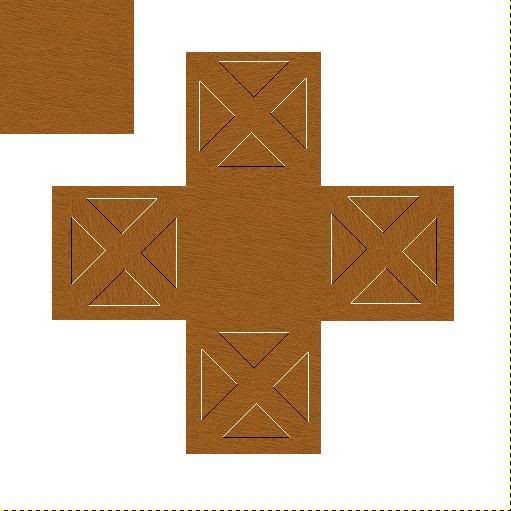
Here it is after opening it:

Any changes you make will be seen on the corresponding faces on your model.
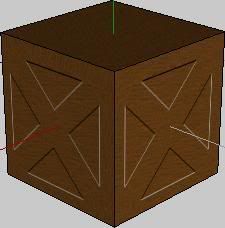
Draw something, and then go to Wings3D, select cube1_auv, and click refresh. If you saved it in GIMP or PS, it will now appear on your cube.
An example:
And it corresponds, like so.
NOTE: I HAD TO ROTATE THE SAME THING SEVERAL TIMES. THIS IS BECAUSE I MAPPED IT LIKE I DID.
Example:
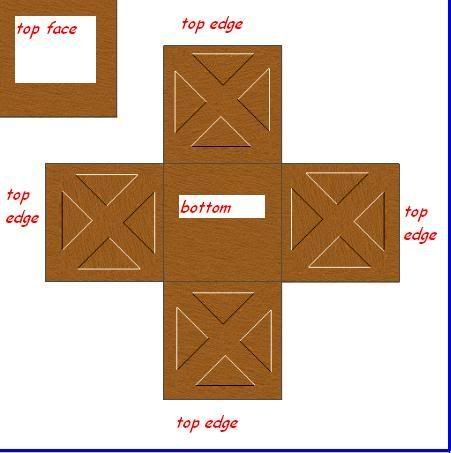
So, the bottom is the middle, and all the edges on the inside are all the edges at the bottom, and the edges at the outside are the edges at the top. Make sense? If not, I am not being clear enough.
Well, that about sums it up. Just click "Make Internal" in Outliner, and then you can even delete the outside texture. Have fun, hope I helped somebody...
Make sure you have advanced mode on.
Go to Edit -> Preferences -> Advanced -> Find Advanced Menus -> Click said box if not already clicked.
Spawn a cube.
Select cube.
Right Click.
Click UV Mapping
A new camera will open, with your cube in it.
Okay, now we come to a hard part (On harder models).
We can UV Map this in different ways, I'll make several examples.
Select all of the lines except the bottom ones.
Now select "Mark Edges for Cut," and then deselect the lines.
Now right click and click "Continue" and then click "Unfolding."
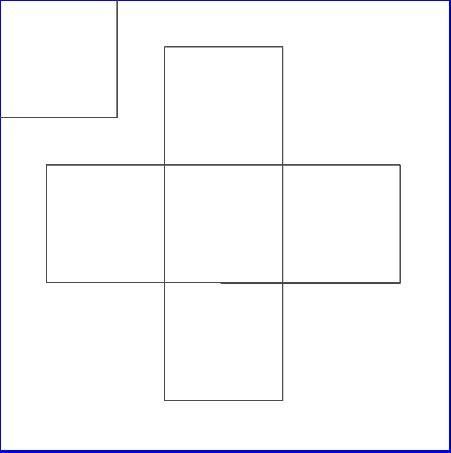
You should get this:
This is your UV map. Technically this would be where the tutorial ends.
But that makes me feel lazy, so let's keep going.
So. What do you do now? You make it easier to texture.
Deselect the small square in the top left, but make sure you kept the others selected.
Move them to the left, then rotate them until they make "perfect" lines.
Or, take one line and use "chart to x/y" to align the line along an axis.
Like so:
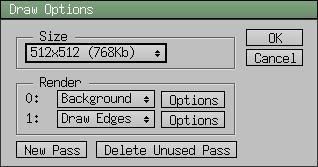
Now, make sure you have everything selected. Right click and find "Create Texture" at the bottom of the menu. When you click on this,
you will see this menu:
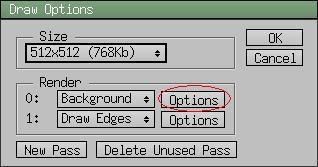
Except, yours has a lot more passes, click on "Delete Unused Pass" and it'll solve your problem.
Click here:
And then select color, and it should default to white, if not.. You should know how to make sure it does.. (PS: Click on the white square)
Click OK, and then click the other OK. Deselect your maps and you should have this:
This is your texture. You need to be able to edit it though, right?
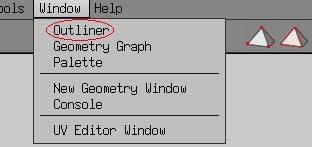
So, select Window->Outliner, at the top:
And now, find cube1_auv:
Left click, then right click and "Make External" should be an option there.
Now save it as cube1_auv.png.
Png is a very versatile image format. As you can see from my screenshots, JPG is not very reliable unless you have full quality, and even then, it does not support alpha channels, like a PNG does.
NOTE: THE NAME OF THE TEXTURE INSIDE AND OUTSIDE MUST STAY THE SAME! DO NOT CHANGE THE NAME OF THE TEXTURE YOU JUST MADE EXTERNAL OR IT WILL NOT SHOW UP FOR YOUR MODEL.
Okay. Find your texture, it may have saved in a folder that you last edited, or in Wings3D's main folder.
Open it up in your best or favorite application for texturing, I would suggest GIMP, if you don't already have Photoshop.
Here it is after opening it:
Any changes you make will be seen on the corresponding faces on your model.
Draw something, and then go to Wings3D, select cube1_auv, and click refresh. If you saved it in GIMP or PS, it will now appear on your cube.
An example:
And it corresponds, like so.
NOTE: I HAD TO ROTATE THE SAME THING SEVERAL TIMES. THIS IS BECAUSE I MAPPED IT LIKE I DID.
Example:
So, the bottom is the middle, and all the edges on the inside are all the edges at the bottom, and the edges at the outside are the edges at the top. Make sense? If not, I am not being clear enough.
Well, that about sums it up. Just click "Make Internal" in Outliner, and then you can even delete the outside texture. Have fun, hope I helped somebody...
