It works for me, but I do not necessarily recommend it as a practice, unless you're extremely comfortable with your tools and know exactly what they're going to do.
Hence the earlier comment, about keeping the flow on airbrushes and pattern-stamp as low as possible, and working different sizes and flows, to keep control. My style allows me to make a lot of mistakes and have it still feel natural, but ALT-SHIFT-Z ("undo, multiple, up to undo limit) is a familiar friend of mine- I often go through a series of steps, review my work in UVMapper Pro (it is an extremely useful tool for preview and editing uvmaps, and that's where these shots come from, although I have been converted to Wings, for speed and simplicity of unwrapping difficult geometry)... then go, "oh !@*!@* that's terrible, it's upside-down / goes over a facet and shows end-users that they're looking at a very low-poly object / destroys the overall feel"... then I Undo, and try again. However, I can do this very quickly, so it's not a big deal, so long as I didn't go over the Undo buffer, and am in a position where I have to completely rework something, or turn a screwup into a feature. I try to avoid that, though!
I use layers, very frequently, as tween stages- I'll do a cutout of a greeble, work it a bit, add a filter, then consolidate, to add grunge. I always add grunge to the final texture, though, because it means that I'm not worried about layer interactions, and it greatly increases the rendering speed, which when working with Pattern Stamp and a large-scale texture (most of the textures I use, for stamping, are 512 tileable stuff, you can never have one too large, if it tiles and otherwise is unique) really keeps things fast, and keeps the flow up.
Basically, don't do as I do, unless you're crazy, or know what you're doing and are totally comfortable with the consequences! If you're doing a greeble, by all means do it on a layer, to keep it clean while your working out levels of light and establishing basic color- I would never, ever, do a greeble freehand directly onto the final texture.
For example... here's a quick look...
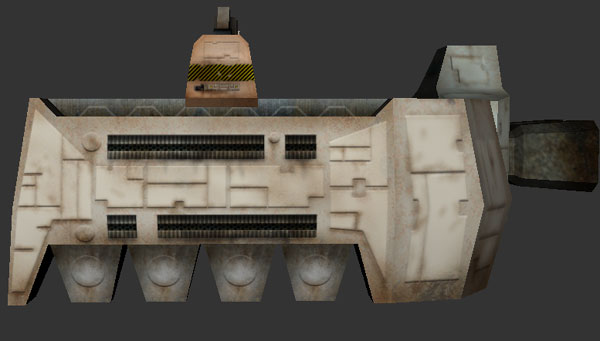
That "safety tape", on the sides of the "construction crane". Let's look at that, for a second, and talk about process (I really should go to bed, but darnit, I know I'll forget to come back to this tomorrow, when I'm working on models):
First, a closeup, of the final object, to put it into context:

Now, how to do this sort of thing? Getting all the edges to wrap like that seems very difficult, for most people. It's not, but you have to be patient.
First step: draw boxes over the relevant faces of your objects, in a new layer, that you think are pretty close to the right width and height, and fill them with a bright color, like this:

Note that I'm waaay zoomed in here, and that I'm using a second layer, to make sure I don't screw up the master!
Now, use whatever you're using as your preview tool (
Wings can be used this way, but the workflow is slower than with UVMapper Pro, which is why I use it, because I can just do a Select All / Copy Merged Action in PhotoShop, saving oodles of time, and UVMapper Pro then displays the merged layers, and you don't destroy them in Photoshop) to view your object, and zoom in, to check your work:

Great, it matches the other pieces of tape exactly! Obviously, I'm cheating here- normally, you're going to need to nudge, and use the Pencil and Eraser tools to get it just right, one pixel row at a time sometimes (this particular task makes me grumpy, as it slows me down, which is why you don't see me doing this wrapping trick a lot, btw).
Once it's perfect, fill it with the texture you're wrapping the object with, and use the master layer to subtract from the upper layer. Use the Magic Wand, select the clear pixels on the master layer, (which btw, you need to keep clean, without overspray, using your choice of methods, or this will be a pain)... and then select the upper layer, hit Delete... voila:

To get the rough edges and tears, I just used the Erasor, set to Brush, and 50% flow. I always soften the edges of things like paint or tape, since it's hard to achieve the really stark line of a piece of tape at the resolution of a RTS skin, and I think it's counterproductive to try, personally, but you can, of course, ignore any of this you want to.
Lastly (again, this is me, not saying this is how everybody should proceed here), once I have softened things up, added some tears, etc., I merge it into the master layer. I do this with each greeble, one at a time, or sometimes in bunches, if they all get the same lighting effect (such as the giant collections of beveled surfaces that make the side panels, they were all just one layer)... and then merge them down to the master, for final postwork. This allows me (again, not suggesting this for everybody here, newbies should play it safer, and use another layer, unless their mouse control is really good) to work with airbrush, the Dodge tool, and Pattern Stamp, first very loosely, to establish preshading and basic patterns of stain, then more closely with smaller brush sizes, to do specific areas of weathering and grunge.
The only exception to this workflow is an important one- if you're going wash out large areas with the Dodge tool, do that first, on the master, before greebling, instead of retroactively later on. You can see this technique on the weathered off-pink paint on the sides of the crane, where I first filled with a much stronger pink (yes, I know it's orange-brown, I ended up doing a color-balance change, the pink was a bit too agressive), did a very faint fill with a random texture to give it some spots of interest, then used a big Dodge brush to "bleach" the sides out to the edges, giving the sides an overall bleached look. SpikedHelmet, whose nice renderings of WWII stuff we've all been enjoying, probably uses a somewhat-similar technique (feel welcome to teach, I liked your bit about hand-greebling, although I must admit I almost always cheat and use layers to keep a tight mask).
... sorry for the length, hope it was useful... now I'm
really going to bed...