Page 19 of 418
Posted: 02 Aug 2007, 18:46
by Snipawolf
Yes, it is an interesting model.

edit: 10-30 minutes doesn't sound like a lot of work..
Whatever, I'm gone before I start some contest or some shit like that, I need to get my lazy ass back to work...

Posted: 02 Aug 2007, 19:07
by Agon
Some informations:
First I searched for a concept draw in the Internet I took one from a Starcraft forum. And made some 2d lines. Copied the lines and past them a little in the background. Made the egg sack in 2d copied paste it in the background. Connected all 2d objects together and had a 3d object. After some size improvements I had this model.
The boards that are going out side from the queen are later spikes, I will make the boards transparent and add the spikes in as 2d textures. This decreases the polycount a lot and will look good.
Posted: 02 Aug 2007, 20:53
by Pressure Line
AF wrote:wall of text telling me i dont know how to texture
GUESS WHAT?? i know i cant texture. and stop acting like i am single-handedly responsible for Cavedog making half of the Pillager a camo texture.
Posted: 02 Aug 2007, 23:30
by AF
Pressureline, that wasnt me telling you you cant texture, that was me speculating on camo textures with the intention of helping. Think of it as more of a suggestion.
Posted: 03 Aug 2007, 01:10
by Pressure Line
indeed. im not offended by any intimation that i cant texture ^_^ im aware of my lack of 2d art skills.
for the most part i am agreed with you on the camo thing, the addition of teamcolour essentially removes any camoflage benefit. the only reason its on there is because it was there on the original (and i quite like it)
while the actual usefulness of the camoflage is minimal at best, it does add a nice militaryesque feel to the units, rather than being bare metal
Posted: 03 Aug 2007, 01:24
by jK
AF, if you want to help then post your rearranged uv map+model, cuz i want to make a texture and don't know how change it myself

Posted: 03 Aug 2007, 01:40
by Pressure Line
i will be home in 4-5 hours... then i can do whatever the heck you want to the model :B
Posted: 03 Aug 2007, 07:20
by Argh
Um, I forgot to hide boob somewhere <hides boob>
BTW, PL, if you ever want me to skin something of yours again, here are some tips:
1. The undersides of things should not take up much texture space. Really. Nobody ever sees the bottom of things in an RTS, with the exception of flying things, or maybe something with really, really, really long legs.
2. If your model is essentially identical on both halves, then design everything to be split down the middle, saving yet more texture space.
3. Mirror more efficiently. The treatment of the tread areas was not very good. Should've taken both inside bits and given them a very small area (after all, we can hardly see those faces), and both outsides should have been stacked on top of each other, to mirror (*occasionally, you don't wanna mirror, for things like writing, but you can generally cheat, even there, by flipping uv coordinates... dunno whether Wings can do that tho).
4. For goodness sakes man, if you're going to redo and "improve" an OTA model, please, go ahead and give us more detail and greebling. Between the inefficient use of texture space and the low detail, I felt a bit constrained, frankly- a 512 should never feel as grainy and low-detail as this one turned out (yes, all you skinners, this wasn't exactly one of Argh's best, but meh, I didn't wanna rebuild his uvmap and large parts of the model, just to make a point here, frankly).
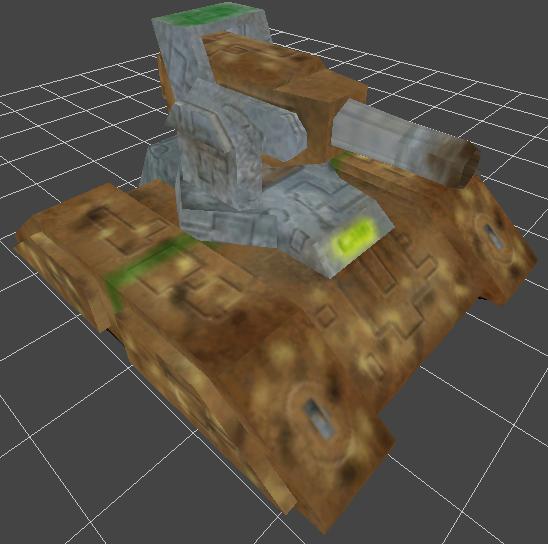
This is what a 512 skin, on an efficiently-unwrapped model, should look like:
Effective use of mirroring (even the treads of the wheels are all mirrored, to get maximum use out of the space here) makes it possible to add quite a bit of detail to the skin. That's what we need- not just a basic unwrap. Also, be wary of distortions, and always use that test-map in Wings, to make sure you don't have any distorted projections- sometimes Wings's unfolding algorithm just doesn't get a certain unfold right, and you'll have to try cutting along a different seam.
Mainly... and this, frankly, just takes experience... you've gotta learn to think like a painter, and get beyond the basics of unwrapping here. Painters are going to want to lavish detail on important areas and greebles, (detailing a greeble, even though it's a smaller area of a model, creates more visual interest then greebling a large planar area, in a lot of cases, and facilitates more creative cheating). Painters will not want to waste very much time on small areas that will rarely be seen by players (the undersides especially- keep 'em no more than half the size of topsides, unless you have a compelling reason). And if you're going to make a habit of reworking OTA stuff, I frankly recommend just rebuilding them from scratch- don't reuse Cavedog's meshes, which have lots of problems, and up the polycount- while I'm not exactly in agreement with Caydr about final polycounts, you can easily spend 1000-1500 (efficiently!!) on something like the Pillager, which is a late-game siegecracker unit.
Posted: 03 Aug 2007, 09:01
by KDR_11k
Argh, use more shading! That thing looks like a rusty, blurry mess of random lines. Make sure the texture responds to the model, e.g. have signs of wear near moving parts, paint material transitions instead of just having a UV seam, paint some ambient occlusion on there and perhaps some stray light (e.g. near a bright green surface the surrounding would have a slight green tint as well because of the diffuse light)! The model should look good in fullbright because it will always encounter situations where it is fullbright, once shading is added it'll only look better. Don't rely on the engine's shading alone, realtime lighting is inaccurate and you can do a better job by helping out with some well painted shadows!
Posted: 03 Aug 2007, 10:00
by SwiftSpear
Argh: That's why I gave up learning to texture to work third party for modders. I just can't stand the way most people set up UV maps when they know they won't be the ones texturing the model. I came to the conclusion if I was ever going to be happy texturing I needed to learn to UV map... and what's the point of learning to UV map if I don't learn modeling as well? And modeling takes time and effort to learn, so I gave up learning to texture independently.
Posted: 03 Aug 2007, 10:08
by aGorm
Yhe... but KDR did you download the texture and take a look at teh UV map... it was full of waste, and totaly unhelpfull for prsudo shading as it was in hundreds of different bits.
I think the main flaw is just that the UV map suxs (NOT berating you here, if your just starting out I dont expect it to be great, im sure with time you will learn to uv map great... )


For reference.. Your UV map should end up like that.
That was my 4th unit... so you can see were some base skills (which im sure you have) will take you!
aGorm
Posted: 03 Aug 2007, 10:45
by Pressure Line
aGorm wrote:I think the main flaw is just that the UV map suxs (NOT berating you here, if your just starting out I dont expect it to be great, im sure with time you will learn to uv map great... )
aGorm
indeed. i didnt really spend much time on the map, maybe 5 minutes? not a lot of thought went into it, and i knew it was rubbish, hence why i posted the 3ds, so argh could make his own, better map if he didnt want to use my crappy one :)
Posted: 03 Aug 2007, 11:47
by Guessmyname

Heavy WIP (Rear parts aren't done yet, still some greeblin' to do on the front parts)
Posted: 03 Aug 2007, 12:01
by aGorm
Some of teh panneling looks a little tooooo sketchy... are you doing it free hand, or blocking it out with the slection tool?
aGorm
Posted: 03 Aug 2007, 12:31
by Guessmyname
By hand. Well, mouse actually.
Posted: 03 Aug 2007, 13:10
by aGorm
That explanes it...
try slecting the region you want for the pannel, and burning and doging the edges apropriatly... or of coures just fill it with the same colour and bevel it to create the pannel. Eitehr way will give you a better result.
aGorm
Posted: 03 Aug 2007, 13:13
by AF
How do you guys do all this mirrorin without spending hours and hours on the UV map?
I do my model in wings in around 20-40 minutes then spend several hours on the UV map. And its usually taking different parts and moving them ontop of each other and fiddling the points so they match up better, it gets quite tedious.
Is there a quickfix to makign all sides of a cube use the same bit of the uv map without making a single face, uv mapping it then copying and repositioning it 5 times?
Posted: 03 Aug 2007, 13:19
by Guessmyname
No, but that can be done really quickly anyway if you use rotate commands.
Posted: 03 Aug 2007, 13:22
by Pressure Line
yep. relatvely easy for something like a cube. easiest way to do it would be to make whole cube 1 uv map, then make all the edges cutlines. then when you have unfolded it, select all 6 faces, rightclick "move to centre" and bang! all 6 faces superimposed on top of each otherthen its just a matter of rotating them so they are aligned the way you want (which for a cube is gonna take about 30 seconds)
*NOTE* this is assuming you are using Wings
Posted: 03 Aug 2007, 15:02
by Maelstrom
Even easier, use the Rotate->Chart To X/Y to rotate things exactly.
Another way, split the model in half right down the center line. Delete one half. UV map the remaining half, and mirror the object to make it whole again. Perfect mirroring.