
OK, this seems to help a little bit. Again, not a panacea, but I think it improves sharpness a bit.
This uses a different filtering algorithm and more aggressive sharpening. For the Photoshop / nVidia DDS plugin. Unzip to a folder, start the plugin via Save-As, then load the settings file.
If you're not using Photoshop, it's using a mid-level sharpen on every mip past 0, Hamming filter, there are other details but they aren't that important.
I also ran the sharpen filter on the base image, just to accentuate the contrast a bit more... seems to help. Ran it over one of my problem children- that Wolfen tank with twin cannons never seemed to come out right, was always a bit blurry- this helped.
I'll re-compress the cars' skins, see what happens to the scene. I am not expecting any miracles, though.
s3o vs 3do
Moderators: MR.D, Moderators
Re: s3o vs 3do
- Attachments
-
- Sharper.zip
- (1.2 KiB) Downloaded 13 times
Last edited by Argh on 08 Dec 2009, 08:22, edited 1 time in total.


Re: s3o vs 3do
What are those odd characters?
Anyhow...
OK, ran the sharper DDS settings, and one level of Sharpen on the base images for the cars. I'm probably just seeing things, because it's late and I don't want this to have been a complete waste of time, but I think it improved details at a distance. Slightly.

K, looked at the others. It's a very small improvement over the original, especially in the midrange... and it totally kicked the ass of forcing mipmaps to 0, imo. So there may be room for further improvement in that direction.
Anyhow...
OK, ran the sharper DDS settings, and one level of Sharpen on the base images for the cars. I'm probably just seeing things, because it's late and I don't want this to have been a complete waste of time, but I think it improved details at a distance. Slightly.
K, looked at the others. It's a very small improvement over the original, especially in the midrange... and it totally kicked the ass of forcing mipmaps to 0, imo. So there may be room for further improvement in that direction.
- Attachments
-
- screen056.jpg
- (411.86 KiB) Downloaded 2 times
Re: s3o vs 3do
The Gimp. However, this is the same problem i've been complaining about since i first started using s3o- On Mr.d's textures, on WIE's, on Crems, on maackeys. Perhaps the Gimp's mipmapping is making it worse, though (or perhaps they're all using box filters).Beherith wrote:What tools do you use to make your dds files for your textures? Because they usually have tons of settings about how to generate mipmaps. I think the default is a box filter, which could lead to crappy results.
Gimp is set to 'default', ive no idea what 'default' is. Okay, i've just tried Nearest, Box, Bilinear, Bicubic and Lanczos. Bicubic is the only measurable improvement:
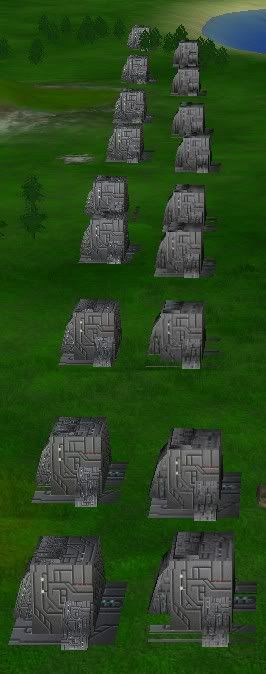
You can clearly see the darkness/contrast is actually better on the s3o, more pronounced, and some detail is preserved- but its still just not good enough.
Okay, how would i go about this?Saktoth, would you mind playing around with the nvdxt.exe settings on making the dds files from the sources?
Argh: Where is springsetting.cfg? Cant for the life of me find it.
Since you cant really see the problem im talking about in those examples, Argh, it would be nice if you could use the demonstration boxes i did up, where the problem is really apparent.
Last edited by Saktoth on 08 Dec 2009, 16:23, edited 1 time in total.
Re: s3o vs 3do
%home%\Local Settings\Application Data\springsettings.cfg
Re: s3o vs 3do
%home%\AppData\Local\springsettings.cfg over here...rattle wrote:%home%\Local Settings\Application Data\springsettings.cfg
Brr why did spring suddenly seem to explode all over my harddrive rather than keeping itself tidy, now i have two mod/maps folders too.
All i have to say is, wow. TextureLODBias=-8 makes a huge difference.
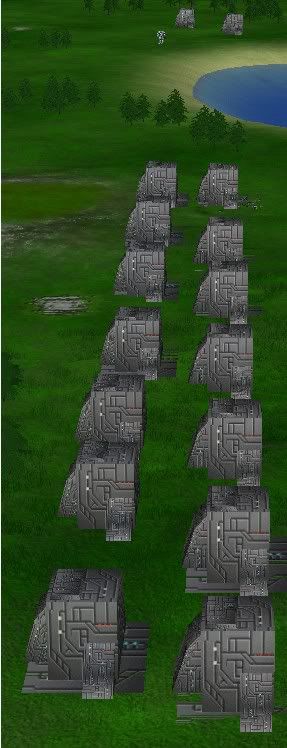
What a difference, you cant even tell which one is s3o.
And compare the spherebots, you cant make out much detail in either case, but the mipmapped one goes completely grey.
Re: s3o vs 3do
this will eat your FPS sooner or later and may introduce moire patterns like tobi mentioned
Re: s3o vs 3do
also, someone ninja edit lemmis post, looks like a broken attempt of charset conversion
Re: s3o vs 3do

Re: s3o vs 3do
If you want spring to be installed, it will use the correct paths for an install, program files in program files, other things in the user folder.
If you want spring in a single folder, the use the portable option. (you can copy springsettings.cfg and the springlobby config into the spring folder to turn it on)
If you want spring in a single folder, the use the portable option. (you can copy springsettings.cfg and the springlobby config into the spring folder to turn it on)
Re: s3o vs 3do
Any more than 3do would suffer from this?rattle wrote:this will eat your FPS sooner or later and may introduce moire patterns like tobi mentioned
Or do you mean more in the ground textures and such?
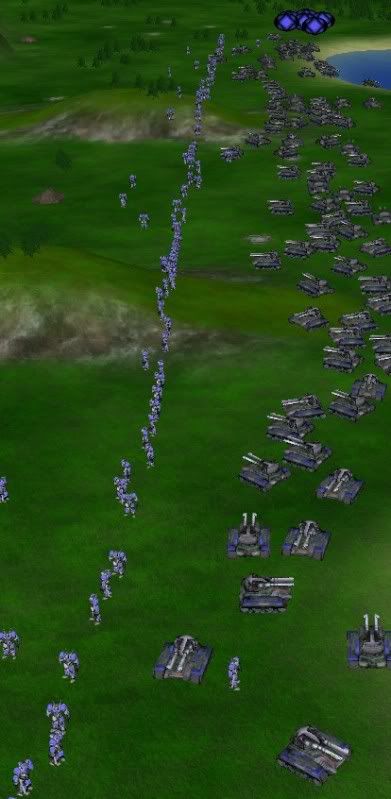
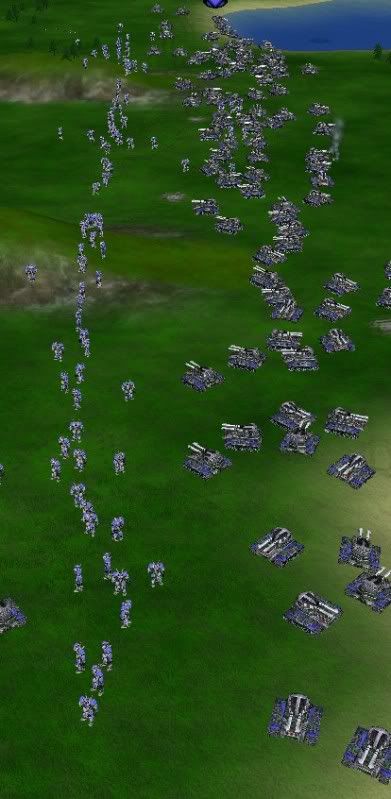
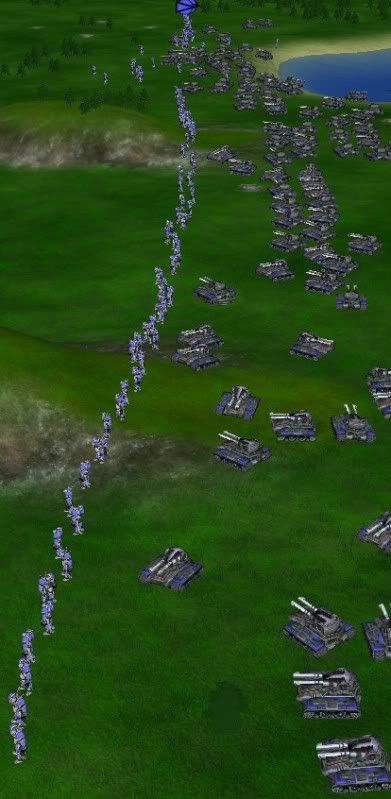
Here are some comparison shots using actual units:
At 0.
Bluurgh. Dull, grey indistict blobs. Look at the reapers right underneath the camera! Blury, yuck.
At -8
Oooooh. Sharp. Crisp. BRIGHT! Much brighter. Look at that detail, you can make out the lines on the tanks barrels, and at a distance they are an assorement of sharp dark/light areas and teamcolour, not grey smudges.
At only -1.
A Marked difference from 0, in fact, it looks closer to -8 than it does to 0.
I suspect -2 would give every bit of crispness you would want from -8, and that -1 is more than sufficient.
I'd be interested to know if people get different results with different hardware, since this looks nothing like arghs tests.

Re: s3o vs 3do
Btw next time please use png, jpg compression makes all look ugly..

Re: s3o vs 3do
for stuff like this the lossy nature of jpg does hurt.

Re: s3o vs 3do
Sak, Im liking the -1 alot. The -8 looks like its in need of some heavy AA, and 0 is just blur city.
Sorry about the wall of text; you can get this recent version of NVDXT from the fixed mapconv thread in the mapping forum (its stickied, first post; in the archive, its named nvdxt2.exe for hakish reasons, feel free to rename)
Important notes about default settings (probably those what gimp uses as well):
Fadeamount is 15, which is mip fading level, and bad.
Default filter is box.
I found -sharpenMethod SharpenSoft and Sharpenmedium to work well with cubic or hamming filtering.
Code: Select all
S:\mapconv\MapConv>nvdxt
NVDXT
This program
   compresses images
   creates normal maps from color or alpha
   creates DuDv map
   creates cube maps
   writes out .dds file
   does batch processing
   reads .tga, .bmp, .gif, .ppm, .jpg, .tif, .cel, .dds, .png and .psd
   filters MIP maps

Options:
  -profile <profile name> : Read a profile created from the Photoshop plugin
  -quick : use fast compression method
  -prescale <int> <int>: rescale image to this size first
  -rescale <nearest | hi | lo | next_lo>: rescale image to nearest, next highest
 or next lowest power of two
  -rel_scale <float, float> : relative scale of original image. 0.5 is half size
 Default 1.0, 1.0
  -clamp <int, int> : maximum image size. image width and height are clamped
  -nomipmap : don't generate MIP maps
  -nmips <int> : specify the number of MIP maps to generate
  -fade : fade MIP maps
  -dither : add dithering
  -sharpenMethod <method>: sharpen method MIP maps
  <method> is
        None
        Negative
        Lighter
        Darker
        ContrastMore
        ContrastLess
        Smoothen
        SharpenSoft
        SharpenMedium
        SharpenStrong
        FindEdges
        Contour
        EdgeDetect
        EdgeDetectSoft
        Emboss
        MeanRemoval
        UnSharp <radius, amount, threshold>
        XSharpen <xsharpen_strength, xsharpen_threshold>
        Custom
  -volume <filename> : create volume texture <filename>. Files specified with -l
ist option
  -flip : flip top to bottom
  -timestamp : Update only changed files
  -list <filename> : list of files to convert
  -cubemap <filename> : create cube map <filename>. Files specified with -list o
ption
                        positive x, negative x, positive y, negative y, positive
 z, negative z
  -all : all image files in current directory
  -outdir <directory>: output directory
  -deep [directory]: include all subdirectories
  -outsamedir : output directory same as input
  -overwrite : if input is .dds file, overwrite old file
  -file <filename> : input file to process. Accepts wild cards
  -output <filename> : filename to write to
  -append <filename_append> : append this string to output filename
  -24 <dxt1c | dxt1a | dxt3 | dxt5 | u1555 | u4444 | u565 | u8888 | u888 | u555>
 : compress 24 bit images with this format
  -32 <dxt1c | dxt1a | dxt3 | dxt5 | u1555 | u4444 | u565 | u8888 | u888 | u555>
 : compress 32 bit images with this format

  -swap : swap rgb
  -binaryalpha : treat alpha as 0 or 1
  -alpha_threshold <byte>: [0-255] alpha reference value
  -alphaborder : border images with alpha = 0
  -fadeamount <int>: percentage to fade each MIP level. Default 15
  -fadecolor : fade map (color, normal or DuDv) over MIP levels
  -fadetocolor <hex color> : color to fade to
  -fadealpha : fade alpha over MIP levels
  -fadetoalpha <byte>: [0-255] alpha to fade to
  -border : border images with color
  -bordercolor <hex color> : color for border
  -force4 : force DXT1c to use always four colors

Texture Format  Default DXT3:
  -dxt1c : DXT1 (color only)
  -dxt1a : DXT1 (one bit alpha)
  -dxt3  : DXT3
  -dxt5  : DXT5

  -u1555 : uncompressed 1:5:5:5
  -u4444 : uncompressed 4:4:4:4
  -u565  : uncompressed 5:6:5
  -u8888 : uncompressed 8:8:8:8
  -u888  : uncompressed 0:8:8:8
  -u555  : uncompressed 0:5:5:5
  -p8    : paletted 8 bit (256 colors)
  -p4    : paletted 4 bit (16 colors)
  -a8    : 8 bit alpha channel
  -cxv8u8: normal maps
  -A8L8   : 8 bit alpha channel, 8 bit luminance
  -fp32x4 : fp32 four channels (A32B32G32R32F)
  -fp32   : fp32 one channel (R32F)
  -fp16x4 : fp16 four channels (A16B16G16R16F)

Optional Mip Map Filtering. Default box filter:
  -Point
  -Box
  -Triangle
  -Quadratic
  -Cubic
  -Catrom
  -Mitchell
  -Gaussian
  -Sinc
  -Bessel
  -Hanning
  -Hamming
  -Blackman
  -Kaiser

***************************
To make a normal or dudv map, specify one of
  -n4 : normal map 4 sample
  -n3x3 : normal map 3x3 filter
  -n5x5 : normal map 5x5 filter
  -n7x7 : normal map 7x7 filter
  -n9x9 : normal map 9x9 filter
  -dudv : DuDv

and source of height info:
  -alpha : alpha channel
  -rgb : average rgb
  -biased : average rgb biased
  -red : red channel
  -green : green channel
  -blue : blue channel
  -max : max of (r,g,b)
  -colorspace : mix of r,g,b
  -norm : normalize mip maps (source is a normal map)

-signed : signed output for normal maps

Normal/DuDv Map dxt:
  -aheight : store calculated height in alpha field
  -aclear : clear alpha channel
  -awhite : set alpha channel = 1.0
  -scale <float> : scale of height map. Default 1.0
  -wrap : wrap texture around. Default off
  -minz <int> : minimum value for up vector [0-255]. Default 0

***************************
To make a depth sprite, specify:
  -depth

and source of depth info:
  -alpha  : alpha channel
  -rgb    : average rgb (default)
  -red    : red channel
  -green  : green channel
  -blue   : blue channel
  -max    : max of (r,g,b)
  -colorspace : mix of r,g,b

Depth Sprite dxt:
  -aheight : store calculated depth in alpha channel
  -aclear : store 0.0 in alpha channel
  -awhite : store 1.0 in alpha channel
  -scale <float> : scale of depth sprite (default 1.0)


Examples
  nvdxt -cubemap cubemap.dds -list cubemapfile.lst
  nvdxt -file test.tga -dxt1c
  nvdxt -file *.tga
  nvdxt -file c:\temp\*.tga
  nvdxt -file temp\*.tga
  nvdxt -file height_field_in_alpha.tga -n3x3 -alpha -scale 10 -wrap
  nvdxt -file grey_scale_height_field.tga -n5x5 -rgb -scale 1.3
  nvdxt -file normal_map.tga -norm
  nvdxt -file image.tga -dudv -fade -fadeamount 10
  nvdxt -all -dxt3 -gamma -outdir .\dds_dir -time
  nvdxt -file *.tga -depth -max -scale 0.5
Version 6.60
Send comments, bug fixes and feature requests to doug@nvidia.com
Re: s3o vs 3do
would this produce sharper maps in mapconv behe?
Re: s3o vs 3do
Well, it looks like this mate;
I dunno if I posted this in my mapconv thread, but you cant use anything but box filter in current mapconv, because of the way the .dds files are constructed (line by line and not tile by tile). I would release my version of it, but it cant handle 32*32 maps cause of a malloc error I cant seem to fix.
They do result in slightly better looking mips, if your interested, I can send you my version. It allows you to pass any param string to nvdxt for compression.
Re: s3o vs 3do
Could you send me your version and some working params to try?
Re: s3o vs 3do
Here it is, might need geovent.bmp though, look at the .bat files for examples of good working params.
If you want to see the difference in the way the two construct the .dds file (old mapconv and mine) then just pause the .dds creation by pressing pause while compiling, and looking at the .bmp files in the temp dir. That should make the reason for scanlines apparant to you. You can press enter after pausing to resume compilation
http://beherith.eat-peet.net/stuff/mapconv_behe.7z
Other advantages include using CUDA enabled texcompress on -q when you have a geforce 8 or higher, it results in 10x faster compression.
Re: s3o vs 3do
Sorry about derailing this thread guys...
Figureing out why scanlines result from using old mapconv with a non nearest neighbour filter from an image like this (temp image made by mapconv for compression into dds) is left as an exercise to the reader:

hint: spring tiles are 32 pixels square.
Figureing out why scanlines result from using old mapconv with a non nearest neighbour filter from an image like this (temp image made by mapconv for compression into dds) is left as an exercise to the reader:
hint: spring tiles are 32 pixels square.
Re: s3o vs 3do
First off, one shot of this gray block thing with LOD bias -8 isn't a very good test. That is why I used the parking lot, so that people could see the noise and a variety of colors and contrast values. I'll dig up that shot again, or reshoot, and post the lossless version, if you really want details, but I really think it's pretty obvious when you compare shots 1, 2 and 3.
Secondly, I don't have the "gray blur" problem at all. Sounds like GIMP's default DDS setting, like nVidia's Photoshop plugin, grays each mip level by default. Shut that option off.
And I agree, -1 / -2 looks pretty good, other than moire patterns on anything with stripes. It's pretty obnoxious on striped patterns though, at certain distances:
- Attachments
-
- screen058.png
- (530.77 KiB) Downloaded 2 times