All you need.. Gimp, for sure.. Blur is a must.
Basic knowledge of Gimp, if I say select a circle, you best know how to do it or you'll be left behind.
Alright, first up, lets make a 50x30 box, we'll put everything in here.
I can't give you good tips on making a metal texture. Everyone does it there own way. I bucket fill the area with the color closest to the one I want, then use bucket fill and dissolve starting and 10 with white, then I keep going down the row, going to 20 percent, then 30 with colors that are close, then I selective blur...
Either way, you'll have some kind of metal, or at least a blank grey if you can't make metal.. So make your metal now. Orr, copy mine if you need it >.>

Alright, now you have some metal, or stole mine.. Good either way.
Now, on to the first thing we are going to do. Raised squares, comes with lighting included.
Select a square 1-3 pixels smaller than the size you want your box to be. Why? You shall find out. Now, do as I do, and you'll see what you should do.

See what I did? I made black envelop the outside, EXCEPT from where the light came.. Now, select 1-3 pixels bigger than the square. If you chose one pixel (I always do) then go to blur it, you should blur this sized square by 3, but then again, the smaller the square the less blur. Remember to use your head..

So, now your finished... With this, I have many more, heh heh...
Undo till you are left with your metal texture only.. We do inset squares now.
Okay, select a square again, I'm going to use the same sized square. It's kinda like last time, except you're going to completely make the whole thing opposite. By this, I mean, white is outside and on bottom, while black is inside and on top. Like this...

Okay, now, we are ready to blur again. Select, and blur, and now it looks like this.

Nice, huh, looks even better from a distance/on the models.
Okay, now we do half-cylinders.
Its pretty much the same, you even still do a BOX! But you cut the lines off halfway...

Okay, got the outline, but how does a BOX become a cylinder? Wanna see?
Select outside of the box by 1, and blur THE HELL out of it. Just blur using the last time about 2 or 3 times.
Result? Cylinder.

Alright, an inset cylinder.. Like last time.. You know how to do it.

Then, of course, more blurring.

(I know, it doesn't look too good, at least to me it doesn't...)
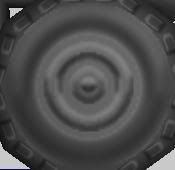
Whoo, the finale. Circles, both inset and extruded...
Okay, circles work kinda like cylinders...

Now, select 1 pixel outside, and blur, a few times of course...

Okay, now an inset circle.. Just like an inset box, ya know..
Except, round..

And, after selecting outside and blurring it once with 3 pixels, you have your inset.

And there you have it, all of the stuff I know how to do, decently.
I personally don't like the cylinder, but then again, it did look good on my tank.. Heres an example of all/most of the things in use.

(I know, the tank base looks overloaded, I got happy I could do all this stuff on a 512 sized texture >.>)
Well, hope this info helped another newb, it took me a long time to get to where I could do it efficiently.
Edit: Forgot the inset circle. It's in now..